Springboot 가 아닌 Spring Framework 프로젝트들은 xml 기반으로 config 를 관리하는 경우가 많을 수 있습니다.
이번 글에서는 xml 기반으로 작성된 프로젝트를 java config 기반의 프로젝트로 마이그레이션 해보겠습니다.
project 소스 코드는 github 에 있고, commit 단위로 마이그레이션을 따라가보시는 것을 추천드립니다
https://github.com/HaJaeKwon/spring-migration-xml-to-java/commits/master
목표
- 레거시 프로젝트와 유사한 환경을 구성해봅니다.
- xml 기반의 Spring Framework 프로젝트를 java config 기반의 프로젝트로 변경합니다.
- Spring Framework 4.2.16 -> 5.0.0 버전업을 진행합니다.
- 위 과정의 일부를 테스트할 수 있는 코드를 같이 개발합니다.
java 기반의 장점
- Bean으로 등록되는 설정들을 파악하는데 효과적인 가독성을 제공합니다.
- xml 기반으로 spring project 를 실제로 구성해보니, 실수도 많고 익숙하지 않은 것들이 많았습니다.
- 설정과 로직을 같은 Java code 로 작성할 수 있습니다.
- IDE의 자동완성 기능과 Break Point 기능을 사용할 수 있습니다.
- 협업시 Bean이 추가등록되면 xml 기반에서는 Confilct가 발생할 수 있습니다.
xml 기반의 프로젝트 구조
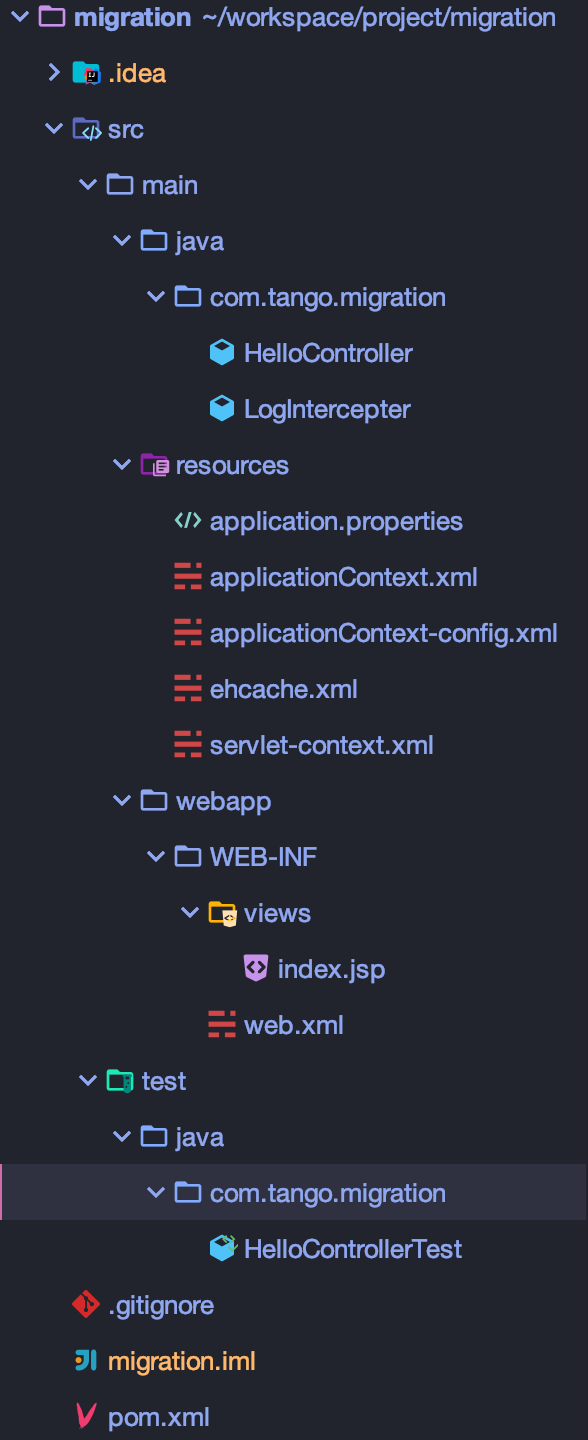
- 프로젝트 환경
- JDK 1.8.0_221
- spring framework 4.3.16.RELEASE
- javax.servlet-api 4.0.1
- jackson-databind 2.9.4
- tomcat 8.5.47
- junit 4.12
- maven 3.6.2
- application.properties
- 환경별로 다르게 설정되어야 하는 프로퍼티 값들이 존재
- datasource, logging level 등등
- applicationContext.xml
- Web MVC 이외의 Bean 이나 설정들이 존재
- Service, DAO, CacheManager 등등
- ContextLoaderListener 객체에 의해 읽어지는 설정 파일
- applicationContext-config.xml
- 관련있는 Bean 이나 설정들을 하나의 xml 파일로 만든 것
@Configuration을 붙이는 하나의 클래스 단위와 유사
- ehcache.xml
- 기본적인 설정은 아니지만, 기존의 프로젝트와 유사한 마이그레이션을 보여주기 위해 추가한 ehcache 설정 파일
- servlet-context.xml
- Web MVC, servlet 관련된 설정 파일
- Controller, Interceptor, ViewResolver 등
- web.xml
- WAS (tomcat) 가 최초 구동될때 읽는 파일
- Root WebApplicationContext 에는
applicationContext.xml의 빈들을 등록하고, Servlet WebApplicationContext 에는servlet-context.xml의 빈들을 등록합니다.
xml to java config
전환 순서
- applicationContext-config.xml
- applicationContext.xml
- servlet-context.xml
- web.xml
1. applicationContext-config.xml 전환
applicationContext-config.xml
<?xml version="1.0" encoding="UTF-8"?>
<beans xmlns="http://www.springframework.org/schema/beans"
       xmlns:xsi="http://www.w3.org/2001/XMLSchema-instance"
       xsi:schemaLocation="http://www.springframework.org/schema/beans http://www.springframework.org/schema/beans/spring-beans.xsd">

    <bean id="userName" class="java.lang.String">
        <constructor-arg value="${user.name}"/>
    </bean>

</beans>
application.properties
user.name=tangoString 타입의 userName 빈 객체가 등록되어있고, 값은 application.properties 파일의 user.name 값을 가져옵니다.
클래스로 만들기 위해 @Configuration 어노테이션을 사용한 Config 클래스를 추가하고, applicationContext.xml 에서 applicationContext-config.xml 파일을 import 하는 부분을 제거 합니다.
- bean id="userName" -> @Bean String userName()
- value="${user.name}" -> @Value("${user.name}") String
태그는 @ImportResource 어노테이션과 동일하고, 이는 자바 파일이 아니라 xml 파일을 import 할 때 사용합니다.
Config.java
@Configuration
public class Config {

    @Bean
    public String userName(@Value("${user.name}") String userName) {
        return userName;
    }
}
applicationContext.xml
<?xml version="1.0" encoding="UTF-8"?>
<beans xmlns="http://www.springframework.org/schema/beans"

...

    <context:component-scan base-package="com.tango.migration"/>

<!--    <import resource="applicationContext-config.xml"/>-->

    <cache:annotation-driven/>

...

</beans>
테스트를 돌려보면 'hello tango' 프로퍼티 값이 정상적으로 반환됨을 확인할 수 있습니다.

2-1. applicationContext.xml 전환
applicationContext.xml
<?xml version="1.0" encoding="UTF-8"?>
<beans xmlns="http://www.springframework.org/schema/beans"
       xmlns:xsi="http://www.w3.org/2001/XMLSchema-instance"
       xmlns:context="http://www.springframework.org/schema/context"
       xmlns:p="http://www.springframework.org/schema/p"
       xmlns:cache="http://www.springframework.org/schema/cache"
       xsi:schemaLocation="http://www.springframework.org/schema/beans
                           http://www.springframework.org/schema/beans/spring-beans-4.2.xsd
                           http://www.springframework.org/schema/context
                           http://www.springframework.org/schema/context/spring-context-4.2.xsd
                        http://www.springframework.org/schema/cache
                           http://www.springframework.org/schema/cache/spring-cache.xsd">

    <bean id="propertyConfigurer"
          class="org.springframework.beans.factory.config.PropertyPlaceholderConfigurer">
        <property name="fileEncoding" value="UTF-8"/>
        <property name="ignoreUnresolvablePlaceholders" value="true"/>
        <property name="ignoreResourceNotFound" value="true"/>
        <property name="locations">
            <list>
                <value>classpath:application.properties</value>
            </list>
        </property>
    </bean>

    <context:component-scan base-package="com.tango.migration"/>

<!--    <import resource="applicationContext-config.xml"/>-->

    <cache:annotation-driven/>

    <bean id="cacheManager" class="org.springframework.cache.ehcache.EhCacheCacheManager" p:cache-manager-ref="ehcache"/>
    <bean id="ehcache" class="org.springframework.cache.ehcache.EhCacheManagerFactoryBean" p:config-location="classpath:ehcache.xml"/>

</beans>
applicationContext.xml 의 PropertyPlaceholderConfigurer, component-scan 부분을 전환하기 위해 AppConfig 클래스를 생성했습니다.
빈 설정의 property 로 넘기는 값들은 해당 클래스의 메소드로 선언되어 있기에 setter 를 사용하여 똑같이 설정해주면 되고, applicationContext.xml 에서 전환한 부분들을 주석 처리합니다.
- bean id="propertyConfigurer" -> @Bean PropertySourcesPlaceholderConfigurer propertySourcesPlaceholderConfigurer()
- context:component-scan -> @ComponentScan("com.tango.migration")
AppConfig.java
@Configuration
@ComponentScan("com.tango.migration")
@PropertySource("classpath:application.properties")
public class AppConfig {

    @Bean
    public static PropertySourcesPlaceholderConfigurer propertySourcesPlaceholderConfigurer() {
        PropertySourcesPlaceholderConfigurer placeholderConfigurer = new PropertySourcesPlaceholderConfigurer();
        placeholderConfigurer.setFileEncoding("UTF-8");
        placeholderConfigurer.setIgnoreUnresolvablePlaceholders(true);
        placeholderConfigurer.setIgnoreResourceNotFound(true);
        return placeholderConfigurer;
    }
}
applicationContext.xml
<?xml version="1.0" encoding="UTF-8"?>
<beans xmlns="http://www.springframework.org/schema/beans"
       xmlns:xsi="http://www.w3.org/2001/XMLSchema-instance"
       xmlns:context="http://www.springframework.org/schema/context"
       xmlns:p="http://www.springframework.org/schema/p"
       xmlns:cache="http://www.springframework.org/schema/cache"
       xsi:schemaLocation="http://www.springframework.org/schema/beans
                           http://www.springframework.org/schema/beans/spring-beans-4.2.xsd
                           http://www.springframework.org/schema/context
                           http://www.springframework.org/schema/context/spring-context-4.2.xsd
                        http://www.springframework.org/schema/cache
                           http://www.springframework.org/schema/cache/spring-cache.xsd">
<!--

    <bean id="propertyConfigurer"
          class="org.springframework.beans.factory.config.PropertyPlaceholderConfigurer">
        <property name="fileEncoding" value="UTF-8"/>
        <property name="ignoreUnresolvablePlaceholders" value="true"/>
        <property name="ignoreResourceNotFound" value="true"/>
        <property name="locations">
            <list>
                <value>classpath:application.properties</value>
            </list>
        </property>
    </bean>

    <context:component-scan base-package="com.tango.migration"/>
-->

<!--    <import resource="applicationContext-config.xml"/>-->

    <cache:annotation-driven/>

    <bean id="cacheManager" class="org.springframework.cache.ehcache.EhCacheCacheManager" p:cache-manager-ref="ehcache"/>
    <bean id="ehcache" class="org.springframework.cache.ehcache.EhCacheManagerFactoryBean" p:config-location="classpath:ehcache.xml"/>

</beans>
그리고 테스트를 돌려보면...

우리가 설정한 user.name 의 값이, 예상한 tango 가 아니라 다른 값이 나오고 있습니다.
아마 다른 곳에서 설정된 값이 덮어씌워진 것으로 예상되는데, 지금은 user.name 이 아닌 name 을 키값으로 변경하고 전환을 진행하겠습니다.
보통은 이런 경우를 막기 위해 app.user.name 과 같이 prefix 를 붙여서, 해당 프로젝트에서 설정된 값임을 명시하는게 좋을 것 같습니다.
그리고 테스트를 돌려보면 성공함을 알 수 있습니다.

2-2. cacheManager 설정 전환
applicationContext.xml 의 마지막 설정인 cache 관련 설정을 전환해보겠습니다.
cache 관련 설정은 총 3가지입니다
- cache:annotation-driven -> @EnableCaching
- bean id="cacheManager" -> @Bean EhCacheCacheManager cacheManager(EhCacheManagerFactoryBean factoryBean)
- bean id="ehcache" -> @Bean EhCacheManagerFactoryBean ehcache(ApplicationContext context)
AppConfig.java
@Configuration
@EnableCaching
@ComponentScan("com.tango.migration")
@PropertySource("classpath:application.properties")
public class AppConfig {

    @Bean
    public static PropertySourcesPlaceholderConfigurer propertySourcesPlaceholderConfigurer() {
        PropertySourcesPlaceholderConfigurer placeholderConfigurer = new PropertySourcesPlaceholderConfigurer();
        placeholderConfigurer.setFileEncoding("UTF-8");
        placeholderConfigurer.setIgnoreUnresolvablePlaceholders(true);
        placeholderConfigurer.setIgnoreResourceNotFound(true);
        return placeholderConfigurer;
    }

    @Bean
    public EhCacheCacheManager cacheManager(EhCacheManagerFactoryBean factoryBean) {
        EhCacheCacheManager cacheManager = new EhCacheCacheManager();
        cacheManager.setCacheManager(factoryBean.getObject());
        return cacheManager;
    }

    @Bean
    public EhCacheManagerFactoryBean ehcache(ApplicationContext context) {
        EhCacheManagerFactoryBean factoryBean = new EhCacheManagerFactoryBean();
        factoryBean.setConfigLocation(context.getResource("classpath:ehcache.xml"));
        factoryBean.setShared(true);
        return factoryBean;
    }
}
applicationContext.xml
<?xml version="1.0" encoding="UTF-8"?>
<beans xmlns="http://www.springframework.org/schema/beans"
       xmlns:xsi="http://www.w3.org/2001/XMLSchema-instance"
       xmlns:context="http://www.springframework.org/schema/context"
       xmlns:p="http://www.springframework.org/schema/p"
       xmlns:cache="http://www.springframework.org/schema/cache"
       xsi:schemaLocation="http://www.springframework.org/schema/beans
                           http://www.springframework.org/schema/beans/spring-beans-4.2.xsd
                           http://www.springframework.org/schema/context
                           http://www.springframework.org/schema/context/spring-context-4.2.xsd
                        http://www.springframework.org/schema/cache
                           http://www.springframework.org/schema/cache/spring-cache.xsd">
<!--
    <bean id="propertyConfigurer"
          class="org.springframework.beans.factory.config.PropertyPlaceholderConfigurer">
        <property name="fileEncoding" value="UTF-8"/>
        <property name="ignoreUnresolvablePlaceholders" value="true"/>
        <property name="ignoreResourceNotFound" value="true"/>
        <property name="locations">
            <list>
                <value>classpath:application.properties</value>
            </list>
        </property>
    </bean>

    <context:component-scan base-package="com.tango.migration"/>
-->

<!--    <import resource="applicationContext-config.xml"/>-->

<!--
    <cache:annotation-driven/>

    <bean id="cacheManager" class="org.springframework.cache.ehcache.EhCacheCacheManager" p:cache-manager-ref="ehcache"/>
    <bean id="ehcache" class="org.springframework.cache.ehcache.EhCacheManagerFactoryBean" p:config-location="classpath:ehcache.xml"/>
-->

</beans>
applicationContext.xml 의 전환이 완료되었지만, 아직 web.xml 에서 해당 파일을 참조하고 있기에 삭제해서는 안됩니다.
3. servlet-context.xml 전환
<?xml version="1.0" encoding="UTF-8"?>
<beans:beans xmlns="http://www.springframework.org/schema/mvc"
             xmlns:beans="http://www.springframework.org/schema/beans"
             xmlns:xsi="http://www.w3.org/2001/XMLSchema-instance"
             xmlns:context="http://www.springframework.org/schema/context"
             xsi:schemaLocation="http://www.springframework.org/schema/beans
                           http://www.springframework.org/schema/beans/spring-beans-4.2.xsd
                           http://www.springframework.org/schema/context
                           http://www.springframework.org/schema/context/spring-context-4.2.xsd
                           http://www.springframework.org/schema/mvc
                           http://www.springframework.org/schema/mvc/spring-mvc-4.2.xsd">

    <annotation-driven/>

    <context:component-scan base-package="com.tango.migration"/>

    <interceptors>
        <interceptor>
            <mapping path="/**"/>
            <beans:bean class="com.tango.migration.LogIntercepter"/>
        </interceptor>
    </interceptors>

    <beans:bean id="jspView" class="org.springframework.web.servlet.view.InternalResourceViewResolver">
        <beans:property name="prefix" value="/WEB-INF/views/"/>
        <beans:property name="suffix" value=".jsp"/>
    </beans:bean>

</beans:beans>
Web MVC, Servlet 관련 설정 파일인 servlet-context.xml 을 전환하겠습니다.
앞서 수행해주셨던 것 처럼 @Configuration 클래스 파일을 생성하고, 내부에 태그 명과 일치하는 어노테이션을 사용하여 자바 코드로 선언해주시면 됩니다.
다만 Web MVC 설정들을 같이 가져와야 하기에 WebMvcConfigurer 의 구현체로 클래스를 작성해주셔야 합니다.
Spring Framework 4.3.16 에서 implements WebMvcConfigurer 를 하면 @EnableWebMvc 를 해주어도 인터페이스 내부 메소드들을 모두 구현해주라는 에러가 뜨게 됩니다.
WebMvcConfigurer 는 5.0 이후 부터 default 가 되었기에 이 부분에서는 Spring Framework 5.0.0.RELEASE 버전 업 후에 진행하겠습니다.
5.0 이전에서는 WebMvcConfigureAdapter 를 참고 부탁드립니다.
- annotation-driven -> @EnableWebMvc
WebMvcConfigurationSupport의 설정 값들을 가져온다
- context:component-scan -> @ComponentScan("com.tango.migration")
- interceptors -> @Override void addInterceptors(InterceptorRegistry registry)
- bean id="jspView" -> @Bean InternalResourceViewResolver internalResourceViewResolver()
- HelloControllerTest 의 @ContextConfiguration 에서 xml 파일이 아닌 class 파일을 가져오도록 수정
WebMvcConfig.java
@Configuration
@EnableWebMvc
@ComponentScan("com.tango.migration")
public class WebMvcConfig implements WebMvcConfigurer {

    public void addInterceptors(InterceptorRegistry registry) {
        registry.addInterceptor(new LogIntercepter())
                .addPathPatterns("/**")
                .excludePathPatterns("/");
    }

    @Bean
    public InternalResourceViewResolver internalResourceViewResolver() {
        InternalResourceViewResolver resolver = new InternalResourceViewResolver();
        resolver.setPrefix("/WEB-INF/views/");
        resolver.setSuffix(".jsp");
        return resolver;
    }
}
servlet-context.xml
<?xml version="1.0" encoding="UTF-8"?>
<beans:beans xmlns="http://www.springframework.org/schema/mvc"
             xmlns:beans="http://www.springframework.org/schema/beans"
             xmlns:xsi="http://www.w3.org/2001/XMLSchema-instance"
             xmlns:context="http://www.springframework.org/schema/context"
             xsi:schemaLocation="http://www.springframework.org/schema/beans
                           http://www.springframework.org/schema/beans/spring-beans-4.2.xsd
                           http://www.springframework.org/schema/context
                           http://www.springframework.org/schema/context/spring-context-4.2.xsd
                           http://www.springframework.org/schema/mvc
                           http://www.springframework.org/schema/mvc/spring-mvc-4.2.xsd">
<!--
    <annotation-driven/>

    <context:component-scan base-package="com.tango.migration"/>

    <interceptors>
        <interceptor>
            <mapping path="/**"/>
            <beans:bean class="com.tango.migration.LogIntercepter"/>
        </interceptor>
    </interceptors>

    <beans:bean id="jspView" class="org.springframework.web.servlet.view.InternalResourceViewResolver">
        <beans:property name="prefix" value="/WEB-INF/views/"/>
        <beans:property name="suffix" value=".jsp"/>
    </beans:bean>
-->
</beans:beans>
HelloControllerTest.java
@RunWith(SpringRunner.class)
@ContextConfiguration(classes = {WebMvcConfig.class, AppConfig.class})
@WebAppConfiguration
public class HelloControllerTest {
  ...
}
4. web.xml 전환, 전환 완료된 xml 파일들 삭제
web.xml
<?xml version="1.0" encoding="UTF-8"?>

<web-app xmlns="http://java.sun.com/xml/ns/javaee"
         xmlns:xsi="http://www.w3.org/2001/XMLSchema-instance"
         xsi:schemaLocation="http://java.sun.com/xml/ns/javaee
                               http://java.sun.com/xml/ns/javaee/web-app_3_0.xsd"
         version="3.0">

    <servlet>
        <servlet-name>appServlet</servlet-name>
        <servlet-class>org.springframework.web.servlet.DispatcherServlet</servlet-class>
        <init-param>
            <param-name>contextConfigLocation</param-name>
            <param-value>classpath:servlet-context.xml</param-value>
        </init-param>
        <load-on-startup>1</load-on-startup>
    </servlet>

    <context-param>
        <param-name>contextConfigLocation</param-name>
        <param-value>classpath:applicationContext.xml</param-value>
    </context-param>

    <listener>
        <listener-class>org.springframework.web.context.ContextLoaderListener</listener-class>
    </listener>

    <filter>
        <filter-name>encodingFilter</filter-name>
        <filter-class>org.springframework.web.filter.CharacterEncodingFilter</filter-class>
        <init-param>
            <param-name>encoding</param-name>
            <param-value>UTF-8</param-value>
        </init-param>
    </filter>

    <filter-mapping>
        <filter-name>encodingFilter</filter-name>
        <url-pattern>/*</url-pattern>
    </filter-mapping>

    <servlet-mapping>
        <servlet-name>appServlet</servlet-name>
        <url-pattern>/</url-pattern>
    </servlet-mapping>

</web-app>
이제 마지막으로 web.xml 설정을 대신할 WebApplicationInitializer 인터페이스의 구현체인 WebInit class 를 만들고 전환해보도록 하겠습니다.
Web MVC 설정들은 <servlet> 태그로 DispatcherServlet 을 선언하고, 이름은 appServlet, 설정은 servlet-context.xml 을 사용하라고 지시하고 있습니다.
Web MVC 관련된 설정이 아닌 것들은 <context-param> 태그로 applicationContext.xml 을 사용하라고 지시하고 있습니다.
위 두가지를 java code 로 변환하게 되면 AnnotationConfigWebApplicationContext 객체로 만들어 container 에 등록하게 됩니다.
encodingFilter 객체를 만들어서 /* 경로에 맵핑하고, appServlet 이라는 servlet 을 / 경로에 맵핑해주면 전환이 완료됩니다.
WebInit.java
public class WebInit implements WebApplicationInitializer {

    public void onStartup(ServletContext container) throws ServletException {

        AnnotationConfigWebApplicationContext appContext = new AnnotationConfigWebApplicationContext();
        appContext.register(AppConfig.class);
        container.addListener(new ContextLoaderListener(appContext));

        CharacterEncodingFilter encodingFilter = new CharacterEncodingFilter();
        encodingFilter.setEncoding("UTF-8");
        container.addFilter("encodingFilter", encodingFilter)
                .addMappingForUrlPatterns(null, false, "/*");

        AnnotationConfigWebApplicationContext servletContext = new AnnotationConfigWebApplicationContext();
        servletContext.register(WebMvcConfig.class);
        ServletRegistration.Dynamic appServlet = container.addServlet("appServlet", new DispatcherServlet(servletContext));
        appServlet.setLoadOnStartup(1);
        appServlet.addMapping("/");

    }
}
@ContextConfiguration 에서 WebMvcConfig.class 대신 WebInit.class 설정을 불러오도록 코드 수정을 한 후 테스트 해보겠습니다.

마무리
Spring boot 의 @SpringBootApplication 어노테이션이 정말 많은 일들을 해주어서 Spring 이라는 프레임워크가 WAS 위에서 어떻게 구동되는건지 잘 몰랐습니다.
이번 기회를 통해 각각의 Context 가 어떤 설정 파일을 필요로 하고, 그것들이 어떻게, 어느 시점에 연결되는지 알게 되었습니다.
- RootContext 에는 service, repository, datasource 등의 빈이 등록된다
- applicationContext.xml, AppConfig class
- ServletContext 에는 controller, view resolver, interceptor 등의 빈이 등록된다
- servlet-context.xml, WebMvcConfig class
- Spring 5.0 이후부터는 WebMvcConfigurer 인터페이스의 구현체로 만들어주어야 한다.
- WAS 구동 시점에 DispatcherServlet 을 만들어 등록하고, 특정 경로로 요청이 들어오면 담당하는 DispatcherServlet 으로 전달해준다.
- web.xml, WebInit class
참고
'spring' 카테고리의 다른 글
| Spring Boot 3.0 변경 내용 (0) | 2023.01.29 |
|---|---|
| Spring Boot 2.4 변경 내용 (0) | 2021.01.19 |
| Spring JDK Dynamic Proxy vs CGLIB 차이점 (0) | 2020.06.14 |


